Alternate Control Points for Airsoft Conquest Scenarios

These Control Points are captured using stopwatches instead of rope

After my initial writeup for Conquest gameplay in airsoft there has been some concern over using knots tied in a rope to control the capturing of a point. The main concern being is that some players will be significantly faster at tying and untying knots than other players, and that some players may be able to tie knots so tight that it’s near impossible for other players to untie them. While in the original writeup it was expected that some players might be better at tying and untying knots (And it some ways that’s part of the fun.) it was never expected that players might might be able to tie simple overhand knots tight enough that it’s nigh impossible to untie them. Some testing of different types of rope to experiment to see which ones can’t be tied into incredibly tight knots may be in order. In any case to address that issue this article presents two alternate versions of the control points, a simple and complex one, that replace the knots with a stopwatch.

About the Stopwatch

Everyone should be familiar with what a stopwatch is. You press a button, it starts counting up time. It pauses if you hit the start/stop button, it resumes counting up time if you hit the start/stop button again, and if you hit the reset button the timer resets back to 0. There isn’t much too special to note here, but since the usage of these stopwatches will often account for the counter being stopped and then started again to plan for captures being interrupted. In these rules start or stop refers to pressing the start / stop button on the stop watch and pausing or resuming the timer. Reset refers to hitting the reset or lap reset button to reset the timer back to 0. Make sure you are familiar with the stopwatch you use before using it and make sure the stopwatch is able to easily pause and resume it’s timer and is able to easily reset it back to zero. The simpler the stopwatch, the better.

Simple Stopwatch Control Point

A Simple Stopwatch Control Point

In this variant everything with the control point is driven by the stop watch. The stopwatch is suspended from a nail or peg from the control point board. When a player is capturing the control point they need to be touching the control point and may not fire their weapon, and medics capturing may not heal. The time it takes to capture the control point for each team is listed on the control point in minutes (This needs to be playtested as minutes might be too long of a time increment.) If the point is neutral then a player from one team only needs to spend the amount of time listed to raise their flag over the control point. If on the other hand the control point is owned by the enemy then they need to spend the amount of time listed for their team to turn the point neutral again and then do it again to capture the point for their team.

Using the example for Control Point #2 on the right, it would take the Red team 6 minutes to capture Control Point #2, 3 minutes to make Control Point #2 neutral, and then 3 more minutes to capture Control Point #2 for Red. If the capture time for the point had listed Blue: 3, Red: 2, then the Red player would have need to 4 minutes total to capture. 2 minutes to make the point neutral, 2 minutes to capture for Red. Conversely for a Blue player to capture such a point from Red they would need to wait 6 minutes, 3 to make it neutral, 3 to capture.

If at any point during the capture process a player is interrupted, such as they need to break body contact with the point, fire their weapon, heal another player, or are hit then they need to stop the timer on the stop watch and hang it back up on the control point. A player from the same team (Including the player that stopped the timer initially) may start the timer again to complete the capture. If a living player from the opposite team makes it to the control point however, then they must reset the timer to zero.  Once capturing is complete a player must also reset the timer to zero.

Example of Capturing a Simple Stopwatch Control Point

Control Point #2 (As seen above) takes 3 minutes for the Red and Blue teams to capture. It starts play neutral. A Blue player reaches Control Point #2, touches the point and starts the timer. After 3 minutes go by they capture the point for Blue and raise the Blue flag, reset the timer, and place it back on it’s peg. Later on a Red player comes to Control Point #2. They touch the point and start the timer. After 3 minutes is reached on the timer they knock down the Blue flag, making the point neutral again. They do not stop the timer and continue to wait until the timer has reached 6 minutes, then they have captured this control point and raise the Red flag over Control Point #2, resetting the timer and placing it back on the peg.

Afterward a Blue player returns to Control Point #2 and begins to capture. They begin capturing the point and start the timer. After 1.5 minutes they see a Red player approaching the point. They stop the timer, place it back on the point, and fire upon the Red player, hitting and wounding him. The blue player returns to point and starts the timer again, resuming from the 1.5 minute mark. The timer passes 3 minutes so the Blue player knocks down the Red flag, making Control Point #2 neutral again. However once the timer reads 4.5 minutes the Blue player is hit and eliminated. The Blue player stops the timer and puts the stopwatch back on it’s peg. A Red player then comes to the now neutral point. The timer on the peg reads 4.5 minutes. However the Red player is on the opposite team so they must reset the timer to 0. The Red player may now start the timer again, and once the timer has reached 3 minutes they have captured Control Point #2 for Red again, they raise the Red flag, reset the timer, and place it back on the peg.

Complex Stopwatch Control Point

Metal Tent Stakes

The simple stopwatch control point works well enough, however it loses a bit of the back and forth the original knots system has because enemy players reset the timer to 0 rather than having to “undo” the capturing of the enemy player. In the Complex Stopwatch Control Point the stopwatch is still used, but the progress of capture is marked by stakes on pegs or hooks. Metal tent stakes are being used for this writeup since they should be cheap to buy and they’re already in a convenient shape, but any convenient object could be used: Wire hangers, plastic rings, loops of string with some kind of weight on the end. As long as it can be hung on a peg, nail, or hook it will work well for this method.

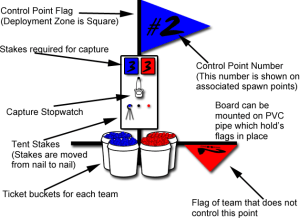
A Complex Stopwatch Control Point

The control point will have three pegs for capturing the control point on it. A Neutral Peg, a Blue Peg, and a Red Peg. Capturing a control point is a process of moving the stakes from one peg to another. Players are allowed to move stakes from one peg to another for every minute they are involved capturing (or re-securing) the control point. Just like the Simple Stopwatch Control Point, when a player is capturing the control point they need to be touching the control point and may not fire their weapon, and medics capturing may not heal. Unlike the Simple Stopwatch Control Point, the stopwatch is always reset when capturing is interrupted. When capturing a player must always move stakes from the enemy team’s peg to the neutral peg first, and once all enemy stakes are on the neutral peg they are then allowed to move stakes from the neutral peg to their team’s peg. A point is captured for a team when the required number of stakes has been moved to their team’s peg on the control point. A point becomes neutral once the team owning it loses all the stakes from it’s peg.

A player is allowed to move a stake to an allowed peg as long as the required time on the stopwatch has passed. If a player’s stopwatch has hit the the minute mark and they are hit they are still allowed to move one stake to the next peg, but afterward they must reset the timer and may not move any more stakes.

Example of Capturing a Complex Stopwatch Point

Control Point #2 (As seen above) starts the game neutral. There are 3 stakes on the neutral peg, and both teams need 3 stakes on their peg to capture the point. A Blue player reaches the point and begins capturing it. They start the timer and for each minute that goes by they move 1 stake from the Neutral Peg to the Blue Peg. Once they have m0ved all 3 stakes to the Blue Peg they have captured Control Point #2 for the Blue team and raise their flag over the point. The Blue player resets the timer after capturing the point.

A little while later a Red player comes to the point and begins capturing it. They start the timer and for each minute that passes they move one stake from the Blue Peg to the Neutral Peg. Once they have moved all 3 stakes off of the Blue Peg and onto the Neutral Peg the point becomes neutral again and the Red player knocks down the Blue flag. The Red player continues capturing the point. 2 more minutes pass, allowing the Red player to move 2 stakes from the Neutral Peg to the Red Peg. However at 5.5 minutes (30 seconds short of capturing the point for the Red team.) the Red player is hit and wounded. The Red player resets the timer and places it back on it’s peg. There is currently 1 stake on the Neutral Peg and 2 stakes on the Red Peg. Control Point #2 is still neutral.

A Blue player returns to the point and begins to capture it. The Blue player is not allowed to move the stake on the Neutral Peg to the Blue Peg because there are stakes on the Red Peg. After 2 minutes pass the Blue Player moves the 2 stakes from the Red Peg to the Neutral Peg. Now that there are no longer any stakes on the Red Peg the Blue player is allowed to move stakes from the Neutral Peg to the Blue Peg. 3 more minutes pass and the Blue Player moves all 3 stakes from the Neutral Peg to the Blue Peg, capturing the point again for the Blue team. The Blue player resets the timer and raises the Blue Flag over Control Point #2.

Another Red player returns and begins capturing the point. 2 minutes pass and they move 2 stakes from the Blue Peg to the Neutral Peg. The Red player is then hit and eliminated. The timer is reset and replaced on it’s peg. Control Point #2 still belongs to the Blue Team. A Blue player spawns at Control Point #2, using up one Blue ticket, and begins the process of securing the point, spending 2 minutes to move 2 stakes from from the Neutral Peg back onto the Blue Peg.

Conquest Scenarios for Airsoft

A diagram of a Control Point

This is a writeup for Conquest-style scenarios in airsoft. Conquest is the iconic game style done in the Battlefield game series and systems like it are used in other similar games such as Day of Defeat. This is not a specific scnario, but an outline for basic rules with which to write scenarios. The driving idea behind this style game is to abstract a large conflict, representative of a massive number of troops for both sides, where the game is actually played with a relatively small number of players, roughly around 20+. This document aims to provide the framework for these style games in a manner that’s easy to setup and organize for airsoft.

Overview

Conquest games focus on the capture of various control points, each one associated nearby respawn points. Each control point has a number of tickets which determine how often members of a team may respawn at that point’s respawn points. For each team there is one deployment zone, which is where that team starts, which is identical to a control point except it cannot be captured by the enemy team. (Optionally, instead of a deployment zone a regular control point may be used, making it possible to stop a team from respawning entirely. This tends to make the perception of where a force’s troops are coming from shift strangely, however.)

A team may win the game by one of two conditions.

A) The other team runs out of tickets at of the spawn points they currently own. Note that players of the losing team may be still “alive” and active, but if their tickets are gone the game is over: They have run out of reinforcements and they are abandoned in the field while their main force is in full retreat.

B) When the time limit for the game is reached the team with more “available tickets” is declared the winner. Available tickets means tickets at all the control points that team owns when time is called. In the case of a tie the team with more control points wins. If it’s still a tie then the game is a stalemate.

Basic Rules

(Note: This is not a comprehensive list of rules. Regular field rules still apply unless contradicted here.)

Each team is assigned a color. Commonly red and blue, though any available color can be used. (Though assigning colors for teams and medics that are not difficult for color blind players IE: Red/green is a good idea.) These colors will be consistently used for each team’s armbands, (or other team markers) flags, ropes, and tickets. Medics are assigned an additional armband in addition to their team color which distinguishes them as medics. The medic color should be the same for both teams.

A hit player is wounded. Wounded players may not move or talk beyond the exceptions allowed by the field. Living players may “move” 1 wounded player by maintaining body contact and leading the wounded player. Medics may heal 1 wounded player by maintaining body contact for 1 minute (recommended) where the medic does not shoot or move the wounded player. If this process is interrupted then it must be restarted from the beginning.

A wounded player has a bleed out time of 2 minutes (recommended) that starts the moment they are hit. Wounded players may not respawn until their bleed out time has passed. Additionally wounded players must respawn if their bleed out time has passed. Wounded players may not begin heading to respawn until their bleed out time has passed. If a medic reaches a player before the bleed out time has passed they may heal the player even if the bleed out time is reached during the healing process. A wounded player who has at least been touched by a medic is not forced to respawn and may wait for a medic indefinitely. (They have been “stabilized” by the medic.) Note that this does not end the bleed out time. A player who was hit and after 30 seconds is touched by a medic, but not healed by them, must stay in place and may not begin respawning until the other 1 minute and 30 seconds have passed.

Optionally, players may also be “stabilized” by another player moving them, instead of only by medics. This encourages players to recover dead players more and helps players not have to worry about counting their bleed out time while being moved.

Control Points and Respawning

Control points consist of the following items.

  1. A numbered flag marker for each team. (Optional “Neutral” flag is possible to aid locating points when no team owns them.)
  2. A bucket for each team containing unused tickets.
  3. A bucket for each team containing used (torn in half) tickets.
  4. A rope colored for each team.
  5. A series of spawn point stakes bearing a number matching the control point

Deployment zones are similar to control points except they only have a flag and buckets for the team that owns them. Deployment zones have no rope on them because they cannot be captured. The deployment zone flag should be different than the control point flag so the enemy team will know not to try capturing them. (In the diagram above triangle flags are control points, square flags are deployment zones.) It is recommended that players be restricted from getting within 100 feet of enemy deployment zones in accordance with the usual “spawn camping” rules. (Note: These rules won’t be in effect at control points because control points are nearby spawn points.

To respawn a player must return to a control point or deployment zone, take out one unused (whole) ticket of their team’s color and tear it in half. The player then needs to goto one of the spawn point stakes for the control point or deployment zone and touch it at which point they have respawned. If they are at a control point which is lost while they are positioning themselves to respawn the player’s ticket is still spent but they need to goto another control point or deployment zone before they may actually respawn. Spawn stakes will be placed nearby control points but away far enough away from the control point so players cannot instantly spawn and take out enemies capturing their control point, or vice versa, keeping players capturing a control point from camping enemies trying to spawn and defend their control point. Alternatively instead of “spawn point stakes” a distance may be designated from the point where they may respawn. In this case each spawn point has a minimum and maximum distance from the point that players may spawn at.

The number of tickets for each team at each control point and deployment zone is set at the beginning of the scenario. Usually the number of tickets is the same for all control points, with deployment zones having a larger number of tickets than a single control point has. Control points with different number of tickets could be used to make a point more valuable for a team to own, could be used to encourage conflicts in certain areas, or could be used to represent that an area deep in enemy territory is harder for one team to control with one team having more tickets there than the other.

The ropes at each control point are used to control capture of the point. Initially the ropes at each control point have no knots in them. To capture a neutral control point a “living” player from that team must tie a pre-determined number of knots into their team’s rope, (Simple overhand knots only) at which point they raise their team’s flag at that control point. (Note: The point is owned by that team once the required knots have been tied. A dead player is allowed to raise the flag at that point.)

To capture an enemy control point a living player must untie all the knots from the enemy team’s rope first. Once the last knot in the enemy team’s rope is untied the control point becomes neutral (players should take down the enemy flag) and no team can spawn there at all. Then a living player must tie the required knots for their team’s rope to capture the control point, at which point they switch the flag to their color and then their teammates can spawn at the point.

A player may re-tie knots in their own team’s rope, but may not tie more knots than the number allotted for that point. A player must always untie knots in the other team’s rope before they are allowed to start tying knots in their own team’s rope, and may never tie knots in their rope if there are knots in the opposing team’s rope.

Alternatively it can be setup so points do not go neutral once a team’s knots have been untied from their rope. In this case players may keep spawning at the control point until the enemy team has tied their last knot and captured the control point, at which point flags are changed. This makes it harder to capture points because defenders may spawn at the control point for a longer period of time.

The basic idea for the game is to require that a number of knots be set for each points which is universal. (For example, five knots.) However if desired each control point can be given different numbers of knots required. In this case each point will have the number of knots required posted next to that team’s rope. For example if a certain control point is more valuable then it may have a higher number of knots required for both teams. Or if a control point is close to one team’s deployment and it’s desired to represent the “home territory” aspect then one team could only need 3 knots on that control point while the other team requires 7 knots.

Example of capturing a control point

Control Point #2 is neutral. A team must tie 5 knots in their rope to capture this point. A Blue player comes to the point and ties 5 knots in their rope, capturing the point and raising the Blue flag over Control Point #2. Blue players may now spawn at the spawn points marked #2. Later on a player from the Red team assaults the point and unties all 5 of Blue’s knots. They knock down the Blue flag and Control Point #2 is neutral again. Now no players may spawn at spawn points marked #2. The Red player ties 3 knots in the Red rope before they are hit and eliminated. Control Point #2 point is still neutral. A Blue player returns and unties all of the Red team’s knots and ties 2 knots in the Blue rope before they are hit and eliminated. The point is still neutral and no players may spawn at spawn points marked #2. After a pitched exchange a Blue player returns and ties 3 more knots into the Blue rope, capturing the point for Blue again and raising the Blue flag over Control Point #2 once more. Blue players may now spawn at the spawn points marked #2 again.

A short while later another Red player assaults Control Point #2 and unties 3 of Blue’s knots before they are hit and eliminated. 2 knots remain on Blue’s rope so Control Point #2 is still owned by the Blue team. A Blue player spawns at one of the #2 spawn points, using 1 Blue ticket for Control Point #2, and reties 2 knots on Blue’s rope. The Blue player may not tie a third knot because that would raise the number of knots of Blue’s rope to 6, which is more than the number required for the point.

Please direct any questions or comments on this to the comments section below. I’ll post an example of what a scenario using these rules would look like in the coming days.

Share